
10 Garden Ideas Using Gravel and Stone Paths
You’ll discover that gravel and stone paths can transform your ordinary garden into an enchanting outdoor sanctuary. By combining smooth river rocks, crisp crushed granite, and natural stepping stones, you’re able to create inviting walkways that define spaces and guide movement throughout your landscape. Whether you’re drawn to the zen-like simplicity of Japanese gardens or the casual charm of Mediterranean designs, these versatile materials offer endless possibilities for customizing your outdoor space.
Contents
- 1 Designing Curved Gravel Paths for Natural Flow
- 2 Creating Japanese-Inspired Stone Walkways
- 3 Mixed Materials: Combining Gravel With Stepping Stones
- 4 Edging Options for Defined Gravel Boundaries
- 5 Mediterranean-Style Crushed Stone Gardens
- 6 Geometric Patterns With Contrasting Stones
- 7 Building Budget-Friendly DIY Gravel Paths
- 8 Lighting Solutions for Stone and Gravel Walkways
- 9 Drought-Resistant Path Gardens
- 10 Selecting the Right Stone Size and Color
Designing Curved Gravel Paths for Natural Flow
Curved gravel paths meander through garden spaces like gentle streams, creating a sense of discovery and natural movement that draws visitors deeper into the landscape. The organic flow of these winding pathways, bordered by flowing ornamental grasses and clusters of flowering perennials, breaks away from rigid geometric designs to mirror nature’s own graceful patterns. Japanese forest grass, lavender, and creeping thyme spill over the path edges, softening the boundaries between walkway and garden bed.
The interplay of textures becomes particularly striking when smooth river rocks mark transition points along the path, while mixed-size gravel creates a satisfying crunch underfoot. Strategic placement of focal points – perhaps a vintage garden bench, a stone lantern, or a distinctive specimen tree – encourages peaceful pauses along the journey. These curved paths naturally lead the eye and feet toward these garden moments, creating an experience that unfolds gradually rather than revealing everything at once.
Key Elements:
- Mixed-size gravel (3/8″ to 3/4″)
- Edge restraints or metal edging
- Landscape fabric
- Border plants
- Focal points
- Stepping stones
- Path lighting
- Drainage materials
- Compact base material
- Curved edge markers
Installation begins with marking the path’s flow using garden hoses or rope to visualize the curves, ensuring they’re gentle enough for comfortable walking while maintaining visual interest. Excavate the path area to a depth of 4-6 inches, install landscape fabric to prevent weed growth, and add a 2-inch layer of compacted base material.
Metal edging should be installed along both sides to contain the gravel, followed by adding and leveling the gravel layer while maintaining a slight crown for drainage.
The secret to successful curved gravel paths lies in the transitions and proportions. Curves should be gradual enough to feel natural, typically with a minimum radius of 4 feet. Where paths intersect or change direction significantly, incorporate wider areas or nodes to create natural pause points. These wider sections can host benches or planters, adding functionality to the design.
Design adaptations can accommodate various space constraints by adjusting path width and curve radius. For smaller gardens, minimize path width to 30 inches and use finer gravel to maintain scale. Consider using stepping stones set in gravel for very small spaces, which can create the illusion of a larger path while using less material.
In tight spaces, focus on creating one significant curve rather than multiple turns, and use vertical elements like ornamental grasses or climbing plants to maximize the sense of space while maintaining the natural flow aesthetic.
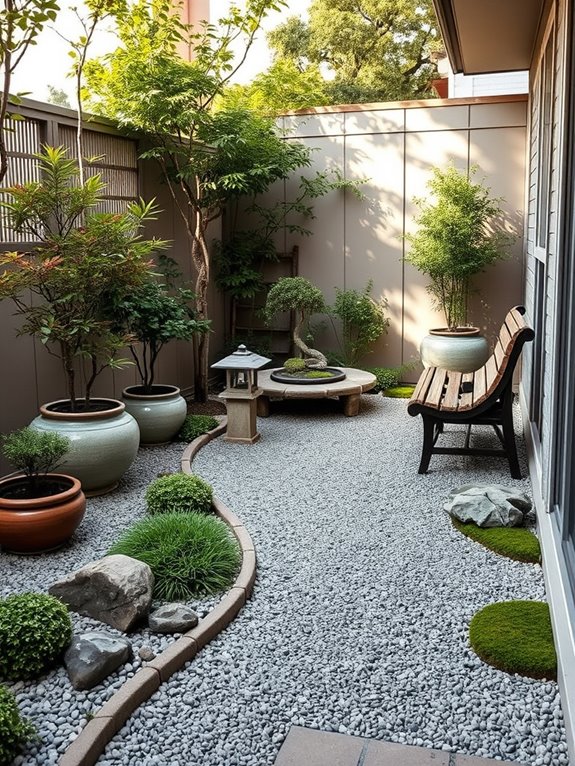
Creating Japanese-Inspired Stone Walkways

Japanese-inspired stone walkways transform ordinary garden spaces into serene sanctuaries where each step becomes a mindful journey. Weathered granite stepping stones, arranged in deliberate asymmetrical patterns, guide visitors through clouds of moss and carefully pruned azaleas. The pathway meanders past traditional elements like stone lanterns and bamboo water features, creating moments of pause and contemplation at every turn.
The interplay between smooth river rocks, carefully raked gravel, and rough-hewn stepping stones creates a mesmerizing textural symphony. Japanese maples cast delicate shadows across the path, while strategically placed boulders anchor the design and provide visual weight. The overall effect is one of natural harmony, where every element serves both a practical and aesthetic purpose in the garden’s composition.
Key Elements:
- Flat stepping stones (granite or slate)
- Fine gravel or crushed stone
- Moss patches
- Stone lanterns
- Bamboo water features
- Japanese maples
- Dwarf conifers
- Large anchor stones or boulders
- Azaleas or rhododendrons
- Bamboo screening
- Raking tools
Begin implementation by establishing the pathway’s flow, considering natural movement patterns and creating gentle curves rather than straight lines. Excavate the path area to a depth of 4-6 inches, adding landscape fabric to prevent weed growth.
Layer decomposed granite or crushed stone as a base, then carefully position stepping stones with irregular spacing to slow the walker’s pace. Allow 2-4 inches between stones for gravel or moss growth, ensuring each stone sits firmly and level with the ground.
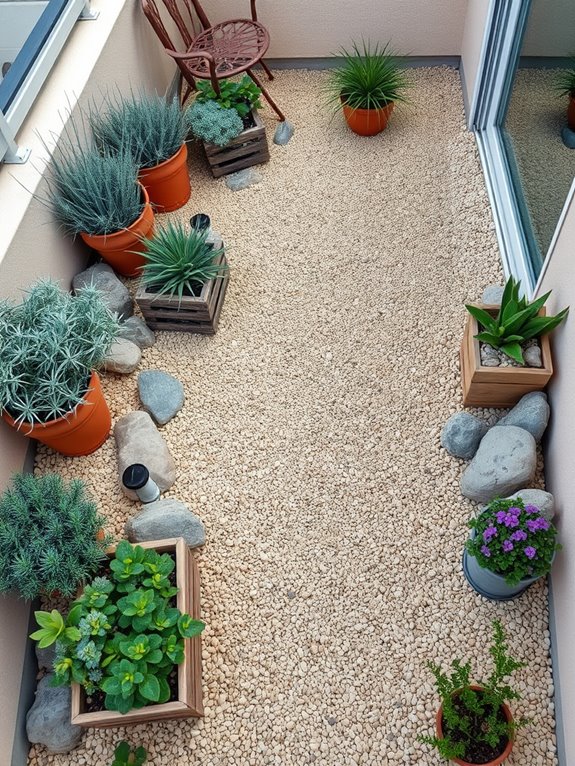
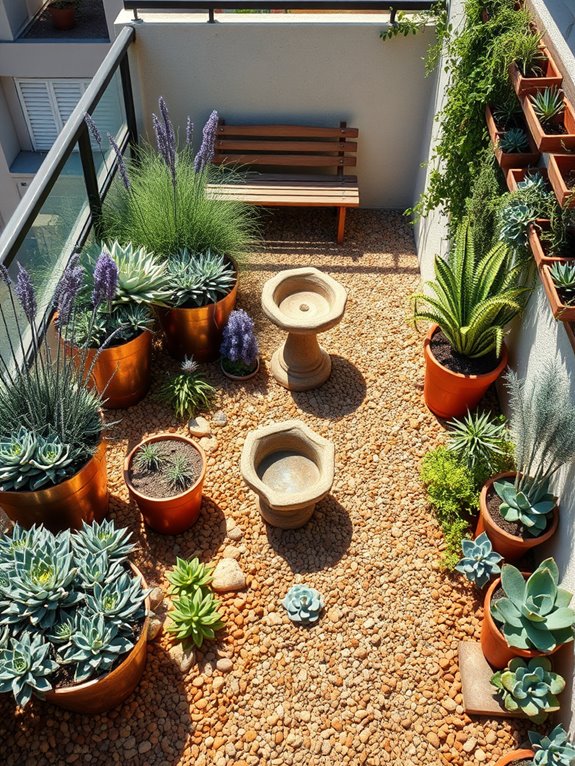
Design adaptations range from full-scale gardens to intimate balcony interpretations. For smaller spaces, use miniature versions of traditional elements and focus on creating depth through layering. Consider vertical elements like bamboo screens or climbing vines to maximize space, and choose dwarf varieties of classic Japanese plants.
Container gardens can incorporate similar principles using shallow trays filled with gravel and carefully placed stones, creating a meditative micro-landscape that captures the essence of larger Japanese gardens.
Mixed Materials: Combining Gravel With Stepping Stones
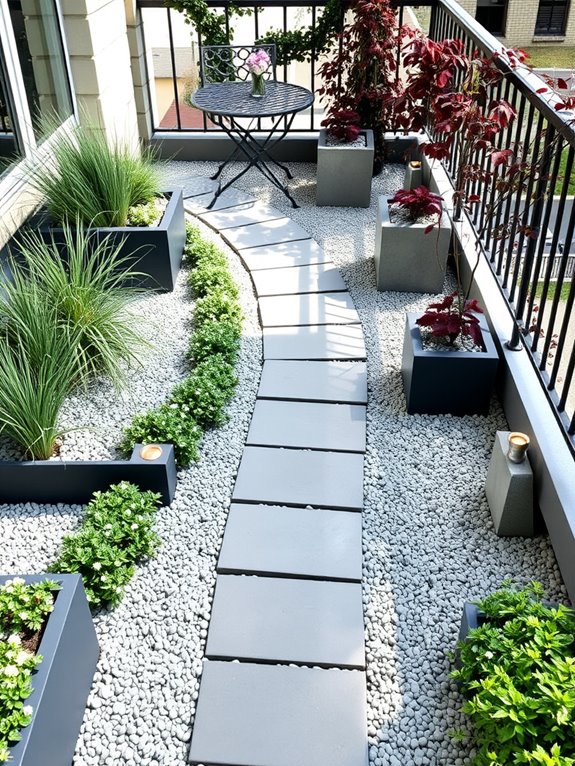
Transform your garden into a serene sanctuary by artfully combining smooth gravel pathways with strategically placed stepping stones. Natural stone pavers nestled within beds of light-colored gravel create an enchanting interplay of textures, while ornamental grasses like feather reed and blue fescue sway gracefully along the edges. Japanese maples and dwarf conifers provide year-round structure, their forms casting intricate shadows across the mixed surface materials.
The harmonious blend of materials evokes both Japanese Zen gardens and English cottage pathways, offering a versatile design that works in any climate. Low-growing creeping thyme and moss phlox soften the edges between stones, while carefully positioned landscape lighting creates dramatic evening shadows that highlight the varied textures of stone and gravel, transforming the path into an artistic composition after sunset.
Key Elements:
- Mixed-size gravel (3/8″ to 3/4″)
- Natural stone stepping stones or pavers
- Edge restraints or border materials
- Landscape fabric
- Ornamental grasses
- Ground cover plants
- Path lighting fixtures
- Decorative rocks or boulders
- Drainage materials
Begin implementation by laying out your path design with rope or garden hoses, ensuring gentle curves rather than sharp angles. Excavate the path area to 4-6 inches deep, install landscape fabric to prevent weed growth, and add a layer of compacted base material.
Position stepping stones first, leaving consistent gaps between them, then fill surrounding areas with gravel. Create slight crowning in the gravel areas to promote proper drainage and prevent pooling.
When designing mixed material paths, consider the golden ratio for spacing stepping stones – approximately 24 inches on center for comfortable walking pace. Choose stones at least 18 inches wide for stable footing, and ensure they sit slightly above the gravel level to prevent gravel migration onto the stone surfaces.
Edge the entire path with metal or plastic edging to contain materials and maintain clean lines.
Scale and proportion are crucial in mixed-material garden paths. For smaller spaces, use fewer, larger stones with fine gravel to create an illusion of space. Apartment balconies can adapt this style using container gardens with miniature versions of the path design, incorporating small pavers and pea gravel in raised beds or troughs.
In wet climates, ensure adequate drainage beneath containers and consider using stabilized gravel products to prevent displacement during heavy rains.
Edging Options for Defined Gravel Boundaries

A meticulously edged gravel pathway creates a sense of intentional design, transforming an ordinary garden into an elegant outdoor sanctuary. The clean lines where gravel meets lawn or flowerbeds, defined by natural stone borders, metal strips, or timber edging, bring structure and sophistication to the landscape.
Purple salvia, cascading creeping thyme, and ornamental grasses soften these boundaries, creating a harmonious blend between the structured and natural elements. The interplay of textures – smooth river rocks against rough-hewn granite blocks, or sleek steel edging alongside delicate ground cover – establishes distinct garden zones while maintaining visual flow.
Whether using traditional brick borders or contemporary cor-ten steel strips, these defined boundaries guide visitors through the space while preventing gravel migration into surrounding garden beds, where lavender and boxwood create living walls along the pathway edges.
Essential Elements:
- Edging materials (stone, metal, timber, or brick)
- Angular gravel or decorative stone
- Border plants for softening edges
- Landscape fabric for weed control
- Level base material
- Drainage components
- Edge restraint spikes or pins
- Corner pieces and connectors
- Measuring tools and string lines
Installation begins with careful planning and precise measurement, marking the intended path boundaries with string lines to ensure straight edges or smooth curves.
Dig a shallow trench along these lines, creating a stable foundation for your chosen edging material. Install landscape fabric before securing the edging in place, ensuring it extends several inches beyond both sides of the border to prevent weed growth and maintain clean lines.
The edging material should sit slightly above the gravel level but low enough for easy mowing if adjacent to lawn areas. For metal or plastic edging, use restraint spikes every few feet to maintain positioning. With stone or brick borders, create a compacted base layer of sand or crushed stone before setting each piece, ensuring they’re level and stable.
When adapting this design for different spaces, consider the scale of materials – smaller spaces benefit from narrower edging and finer gravel, while larger areas can accommodate more substantial borders.
In wet climates, incorporate additional drainage channels along edging boundaries, and in areas with freeze-thaw cycles, choose flexible edging materials that can withstand ground movement. For curved pathways, opt for flexible edging materials or create gradual curves using short, straight sections of rigid materials.
Mediterranean-Style Crushed Stone Gardens
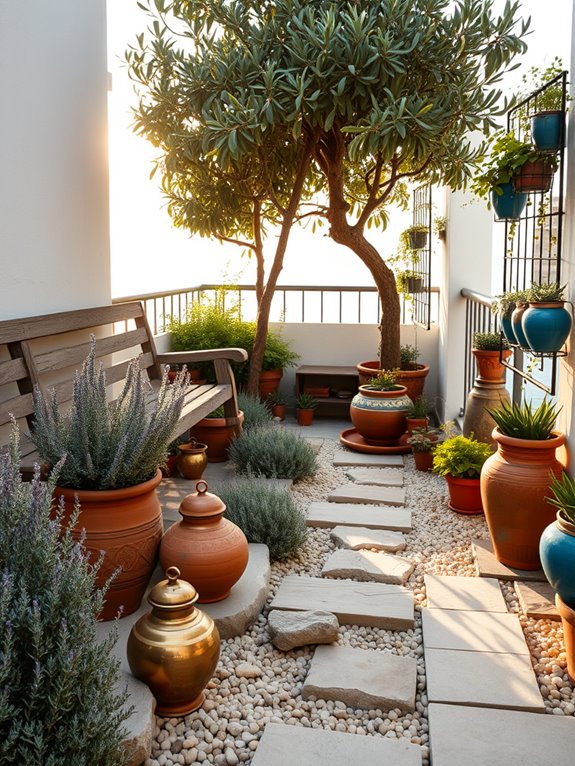
Transport yourself to the sun-drenched coasts of Greece and Italy with a Mediterranean-style crushed stone garden that captures the essence of casual elegance and natural beauty. Weathered terracotta pots overflow with fragrant lavender and rosemary, while twisted olive trees cast intricate shadows across pale limestone gravel paths.
The warm, earthy tones of crushed stone create a harmonious backdrop for drought-resistant plants, combining silvery-green foliage with bursts of purple, yellow, and white blooms. This garden style evokes a sense of timeless tranquility, where rustic stone walls and weathered wooden benches invite quiet contemplation.
Mediterranean cypresses stand as elegant sentinels, while creeping thyme and oregano release their aromatic oils when brushed against. The interplay of textures – from smooth river rocks to rough-hewn stepping stones – adds visual interest and grounds the space in ancient traditions.
Key Elements:
- Light-colored crushed limestone or marble chips
- Terra cotta pots and urns
- Mediterranean cypress trees
- Olive trees or shrubs
- Lavender plants
- Rosemary bushes
- Thyme and oregano
- Stone walls or raised beds
- Weathered wooden furniture
- Ceramic tile accents
- Large decorative rocks
- Metal garden sculptures
Begin implementation by establishing a proper drainage foundation, laying landscape fabric beneath a 2-3 inch layer of crushed stone. Create defined areas using larger stones or concrete edging to contain the gravel.
Position key architectural elements first – walls, large containers, and trees – to establish the basic structure. Layer in medium-sized plants in groupings, allowing adequate space for growth. Complete the design by adding ground covers and trailing plants to soften edges and create natural transitions between different areas.
Design Adaptations: For smaller spaces or balconies, focus on container gardening with varied heights of terra cotta pots. Use vertical elements like wall-mounted planters and climbing vines to maximize space.
Consider miniature varieties of Mediterranean plants and create the illusion of space with strategically placed mirrors or light-colored pavers. Ensure weight restrictions are considered when adding stone elements to elevated spaces, and opt for lightweight alternatives when necessary.
Geometric Patterns With Contrasting Stones
The striking interplay of angular stone patterns creates a mesmerizing visual symphony in geometric garden designs. Dark charcoal slate pieces intersect with light limestone gravel, forming bold chevrons, diamonds, and circular medallions that draw the eye through the space.
Ornamental grasses like blue fescue and Japanese forest grass soften the rigid lines, while carefully placed boxwood spheres anchor the corners of each geometric section, creating a sophisticated balance between structured design and natural elements.
Mediterranean herbs and compact flowering plants add bursts of color within the geometric framework, thriving in the well-draining gravel environment. Purple lavender, creeping thyme, and silver-leafed artemisia complement the stone palette while introducing sensory elements to the design.
The contrasting textures and colors of the stones create stunning shadow plays throughout the day, transforming the garden’s appearance as the sun moves across the sky.
Essential Elements:
- Two contrasting stone types (light and dark)
- Angular edging materials
- Geometric pattern templates
- Landscape fabric
- Compact evergreen shrubs
- Ornamental grasses
- Mediterranean herbs
- Solar accent lighting
- Stone setting tools
- Compacting equipment
Implementation begins with careful planning and precise measurement of the space, followed by creating a detailed pattern design on paper. Install landscape fabric to prevent weed growth, then establish rigid borders using metal or plastic edging to maintain clean lines between different stone sections.
Layer the stones according to your pattern, ensuring proper depth for stability. Compress each section thoroughly before moving to the next, maintaining consistent levels throughout the design.
Extra Design Tips: Consider the viewing angles when planning geometric patterns, as they should be visible from key positions like windows or seating areas. For smaller spaces, use scaled-down patterns and limit color variations to avoid visual overwhelm.
Balcony gardens can incorporate geometric designs using lightweight composite pavers and container plantings arranged in corresponding patterns. Ensure proper drainage channels are incorporated into the design, especially in confined spaces, and select drought-tolerant plants that won’t overgrow and obscure the geometric patterns.
Building Budget-Friendly DIY Gravel Paths
Creating a budget-friendly DIY gravel path transforms an ordinary garden into an enchanting journey through nature. Winding paths of pale granite or warm honey-colored pea gravel meander between clusters of drought-resistant salvias and ornamental grasses, their informal edges softened by creeping thyme and silver-leafed artemisia.
Solar-powered path lights nestled among river rocks cast gentle pools of illumination at dusk, while recycled stepping stones create focal points along the route. The organic flow of a DIY gravel path brings a sense of discovery to even the smallest garden space. Purple coneflowers and black-eyed susans nod over the path’s edges, attracting butterflies and creating movement in the breeze.
Vintage finds like weathered terra cotta pots or repurposed metal containers filled with succulents add personality without breaking the budget, while strategic placement of larger stones creates natural-looking stopping points for rest and contemplation.
Key Elements:
- Landscape fabric or weed barrier
- Gravel (pea gravel, crushed granite, or river rock)
- Edge restraints (plastic, metal, or stone)
- Garden tools (shovel, rake, wheelbarrow)
- Stepping stones or pavers
- Path lighting
- Border plants
- Decorative rocks
- Mulch for edges
Implementation begins with careful path planning – marking the route with string or garden hose to ensure pleasing curves and adequate width. After removing existing turf and soil to a depth of 4-6 inches, lay landscape fabric to prevent weed growth.
Install edge restraints along both sides to contain the gravel, then add a base layer of larger stones for drainage. Top with a 2-3 inch layer of chosen gravel, tamping down each layer for stability. For optimal results, consider your local climate and drainage patterns when selecting materials.
Choose gravel colors that complement your home’s exterior and existing hardscape elements. Path width should be at least 3 feet for comfortable walking, with wider sections at curves or gathering spots. Regular maintenance includes occasional raking to redistribute gravel and removing any debris or weeds that manage to take hold.
Expert Tips: Start small to perfect your technique before tackling larger projects. For sloped areas, create subtle steps using pressure-treated lumber or stone risers to prevent gravel migration.
In tight spaces or on balconies, create defined pathway sections using container gardens as borders, and opt for smaller gravel sizes to maintain scale. Consider incorporating permeable surfaces beneath the gravel in areas with poor drainage, and always factor in accessibility needs when planning path width and surface stability.
Lighting Solutions for Stone and Gravel Walkways
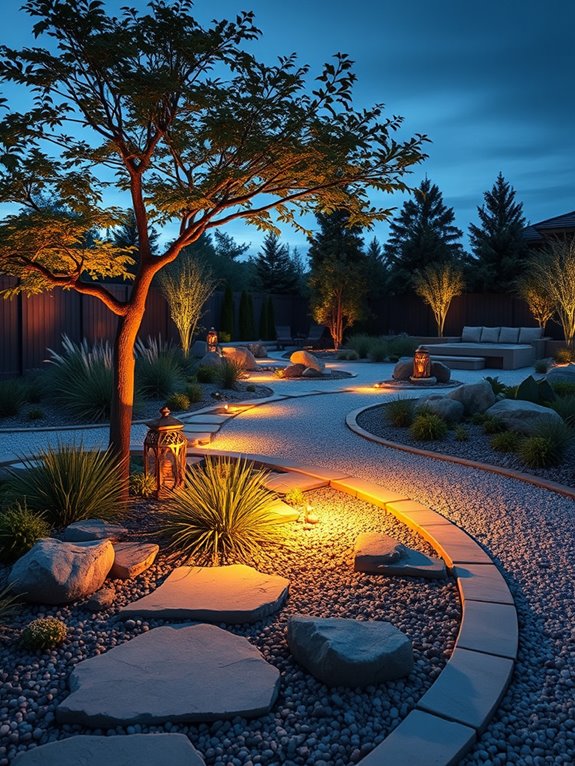
Illuminated stone and gravel pathways transform an ordinary garden into a magical nighttime sanctuary. Soft LED lights nestled among river rocks cast gentle shadows across textured stone surfaces, while strategically placed solar-powered path lights create a warm, inviting glow that guides visitors through the garden.
Japanese maples and ornamental grasses dance in silhouette against the lighting, while creeping thyme and low-growing sedums between pathway stones catch and reflect the subtle illumination. The interplay of light and shadow adds depth and mystery to the garden space after sunset, turning it into an enchanting retreat.
Solar-powered lanterns tucked among boulder arrangements create focal points, while recessed lighting beneath garden features highlights architectural elements and water features. The combination of different lighting techniques – uplighting, downlighting, and path lighting – creates layers of illumination that enhance both safety and ambiance.
Key Elements:
- Solar-powered path lights
- LED strip lighting
- Recessed stone lights
- Motion-sensor security lights
- Light-colored gravel or stones
- Reflective plant materials
- Timer controls
- Weather-resistant fixtures
- Transformer and wiring system
- Light shields and diffusers
Installing effective garden lighting requires careful planning and strategic placement. Begin by mapping out primary walkways and focal points, then position main path lights at 6-8 foot intervals. Install lights slightly below eye level to prevent glare, and ensure fixtures are secured firmly in gravel or anchored to stone surfaces.
Layer lighting by combining different heights and intensities, starting with essential path illumination and building outward to accent lighting for plants and features. Consider environmental factors and maintenance requirements when selecting lighting solutions. Use warm white bulbs rated for outdoor use, and position fixtures away from areas where leaves and debris collect.
Install lighting systems on separate circuits to allow for seasonal adjustments, and incorporate timers for energy efficiency. When adapting lighting designs to different spaces, scale is crucial. Smaller gardens benefit from fewer, more impactful lights rather than numerous small fixtures.
For compact areas, focus on highlighting key features and ensuring safe passage rather than attempting to illuminate every corner. Consider using wall-mounted lights or hanging lanterns in areas where ground space is limited, and opt for solar solutions to avoid complex wiring in tight spaces. Regular cleaning of fixtures and prompt replacement of failed bulbs will maintain the garden’s nighttime appeal throughout the seasons.
Drought-Resistant Path Gardens
Transform your outdoor space into a striking drought-resistant path garden where winding gravel trails lead through a carefully curated landscape of resilient beauty. Sun-bleached stones and varying sizes of pebbles create meandering pathways that weave between clusters of silver-leafed artemisia, purple-flowering salvias, and towering ornamental grasses that dance in the breeze.
Mexican feather grass and lavender border the paths, their gentle movement adding a dynamic element while requiring minimal water to thrive. The garden comes alive with structural elements like weather-worn boulder specimens and architectural succulents, including bold agave plants and rosettes of echeveria.
Desert-adapted flowering perennials such as yarrow and Russian sage provide bursts of color throughout the seasons, while decomposed granite pathways sparkle in the sunlight, creating an inviting journey through this water-wise landscape.
Key Elements:
- Gravel or decomposed granite for paths
- Large accent boulders
- Drought-tolerant perennials
- Ornamental grasses
- Architectural succulents
- Mediterranean herbs
- Path edging materials
- Solar path lights
- Drip irrigation system
- Landscape fabric
- Mulch for plant beds
Begin implementation by clearing the designated area and laying landscape fabric along planned pathways. Install edging materials to contain the gravel and create distinct borders between paths and planting areas.
Pour and compact a 3-inch layer of gravel or decomposed granite for the paths. Position large boulders first as focal points, then arrange drought-resistant plants in groups of odd numbers, placing taller specimens toward the back and shorter plants along path edges.
For ongoing maintenance, apply a pre-emergent herbicide to gravel areas twice yearly to prevent weed growth. Establish a drip irrigation system on a timer, focusing on deep, infrequent watering to encourage deep root growth. Trim back perennials and grasses in late winter, and refresh gravel paths annually by topping off with new material as needed.
Design Tip: For smaller spaces or balconies, create a similar effect using containers of varying heights filled with drought-resistant plants. Replace large boulders with architectural pottery or small rock gardens, and use different colored gravels to define spaces.
Consider vertical elements like wall-mounted succulent gardens or climbing vines on trellises to maximize limited space while maintaining the water-wise aesthetic. Ensure proper drainage by elevating containers and using fast-draining potting mix specifically formulated for drought-resistant plants.
Selecting the Right Stone Size and Color

Thoughtfully chosen stone sizes and colors transform an ordinary garden path into a masterpiece of natural artistry. Smooth river rocks in varying shades of gray and tan create a meandering journey through the landscape, while angular slate pieces in deep charcoal and purple-tinged hues add dramatic contrast against lush greenery. The interplay of different stone sizes – from large stepping stones to delicate pea gravel – creates visual rhythm and interest, drawing the eye naturally through the garden space.
The selection of stone colors can dramatically influence the garden’s mood and complement existing architecture. Warm-toned stones like rose quartz and honey-colored granite create an inviting Mediterranean atmosphere, especially when paired with lavender and ornamental grasses. Cool-toned bluestone and white marble chips reflect light beautifully, making paths appear to glow in moonlight while providing elegant contrast against dark mulch and rich foliage.
Essential Elements:
- Base layer crushed stone (3/4 inch)
- Walking surface gravel (1/4 to 3/8 inch)
- Accent stones (2-4 inches)
- Stepping stones (12-24 inches)
- Landscape fabric
- Metal or plastic edging
- Sand for leveling
- Decorative border stones
Begin installation by preparing the path area with proper drainage and laying landscape fabric to prevent weed growth. Layer crushed stone as the foundation, ensuring proper compaction for stability. Add larger decorative stones strategically as focal points or stepping areas, then fill surrounding spaces with smaller gravel, creating natural transitions between different stone sizes.
Maintain distinct borders between stone types using sturdy edging materials to prevent migration and mixing. When designing your stone path, consider traffic patterns, drainage needs, and seasonal maintenance. Choose slip-resistant materials for frequently used paths and slightly larger stones for areas prone to water accumulation.
Smaller spaces can utilize miniature versions of these elements – consider creating a contained gravel garden with carefully placed accent stones and compact ground covers between pavers. For balcony gardens, use lightweight stone alternatives and create defined zones using different gravel colors in shallow containers.