
7 Garden Ideas Using Upcycled Materials
You’ll discover endless possibilities when you start looking at everyday items through a creative gardener’s lens. That old wooden pallet in your garage can transform into a stunning vertical herb garden, while unused kitchen colanders become charming hanging planters. As you explore these seven innovative upcycling ideas, you’ll find yourself spotting potential garden treasures in the most unexpected places. Whether you’re working with a tiny balcony or a sprawling backyard, these sustainable solutions will help you craft a unique outdoor space that reflects your personality.
Contents
- 1 Transform Old Pallets Into Vertical Garden Walls
- 2 Create Unique Planters From Vintage Kitchen Items
- 3 Design a Ladder Plant Stand From Salvaged Wood
- 4 Turn Glass Bottles Into Garden Border Edging
- 5 Build a Trellis Using Old Bicycle Wheels
- 6 Craft Bird Feeders From Teacups and Saucers
- 7 Make Garden Path Stepping Stones From Broken Tiles
Transform Old Pallets Into Vertical Garden Walls
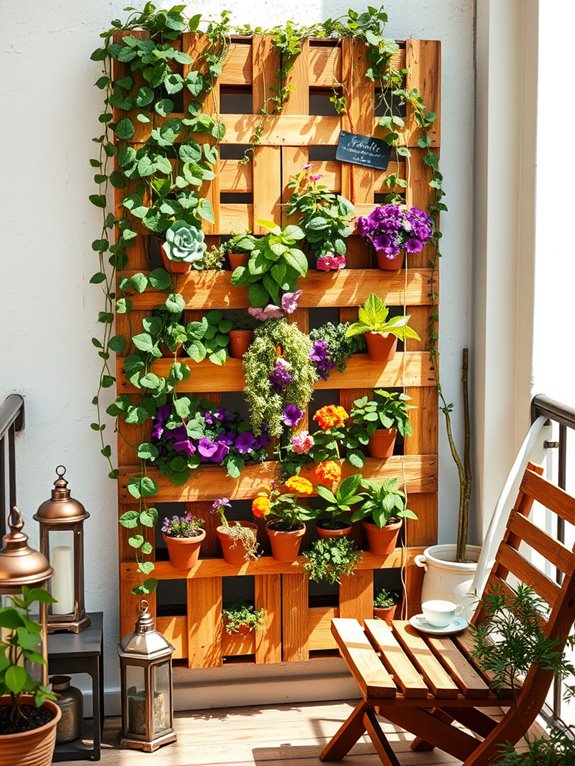
A striking vertical garden wall fashioned from reclaimed wooden pallets transforms an ordinary outdoor space into a living tapestry of cascading greenery and blooms. Succulents peek from between weathered slats, while trailing vines like pothos and ivy create elegant green waterfalls. Small herb gardens nestled within the pallet’s compartments release aromatic fragrances, as compact flowering plants like petunias and marigolds add vibrant splashes of color against the rustic wood backdrop.
The vertical design maximizes growing space while creating an artistic focal point that draws the eye upward, making even the smallest patio feel more expansive and garden-like. The natural aging of the pallet wood adds character and warmth, while the organized arrangement of plants creates a professional, designed appearance. This living wall serves as both a practical growing space and an eco-friendly piece of garden art that evolves with each season.
Key Elements:
- Wooden pallets (heat-treated, food-grade)
- Landscape fabric
- Potting soil
- Small to medium-sized plants
- Mounting brackets and hardware
- Drip irrigation system or watering can
- Wire mesh or netting
- Wood sealant or preservative
- Plant containers or liner pockets
Creating a pallet garden wall begins with thorough preparation of the wood structure. Sand rough edges and treat the wood with a plant-safe sealant to prevent rotting. Line the back and sides with landscape fabric, creating individual pockets for plants. Secure the pallet to a sturdy wall using proper mounting brackets, ensuring it can support the weight of soil and mature plants.
Install a simple drip irrigation system or plan for regular manual watering of all levels. Design success depends on choosing plants suited to the varying light and moisture conditions within the vertical structure. Place drought-tolerant plants at the top where water drains quickly, and moisture-loving varieties toward the bottom. Consider the mature size of each plant to prevent overcrowding, and group plants with similar water needs together.
Regular maintenance includes pruning, fertilizing, and checking the stability of the mounting system.
Adaptation Tip: For smaller balconies, use half-pallets or create modular sections that can be arranged to fit available space. In areas with limited direct sunlight, opt for shade-tolerant plants like ferns and peace lilies. Consider installing the pallet garden on wheels for mobility, allowing adjustment to seasonal sun patterns or protection from harsh weather. Indoor applications are possible with proper waterproofing and adequate lighting, though plant selection should be adjusted accordingly.
Create Unique Planters From Vintage Kitchen Items
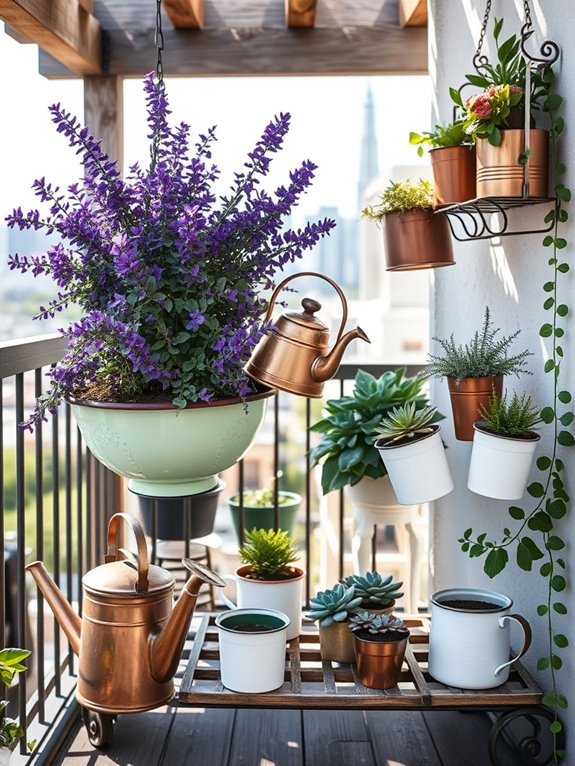
Transform your garden into a charming conversation piece by repurposing vintage kitchen treasures into distinctive planters. Weathered colanders overflow with cascading herbs, while antique teapots cradle delicate succulents, creating an enchanting blend of nostalgia and natural beauty.
Enameled pots in faded pastels host vibrant clusters of trailing lobelia and petunias, while rustic copper kettles showcase hardy lavender and thyme, their silvery foliage complementing the patinated surfaces.
Old ceramic mixing bowls and pudding molds become striking focal points when filled with drought-tolerant sedums and echeveria, their geometric patterns playing against the organic forms of the plants.
Vintage bread tins lined along windowsills create linear herb gardens, while suspended collections of enamelware cups and milk jugs transform vertical spaces into hanging gardens dripping with ivy and string-of-pearls succulents.
Key Elements:
- Vintage colanders and strainers
- Antique teapots and coffee pots
- Enamelware bowls and containers
- Old bread tins and baking pans
- Copper or brass kettles
- Ceramic mixing bowls
- Milk jugs and cream pitchers
- Wire bottle racks or shelving
- Drainage materials
- Appropriate potting soil
- Selection of suitable plants
Implementation requires careful preparation of each vessel to ensure proper drainage. Drill holes in containers that lack them, using appropriate bits for metal, ceramic, or enamelware.
Layer the bottom of each container with gravel or broken pottery pieces, then add high-quality potting mix suited to your chosen plants. Arrange containers at varying heights using vintage cake stands, wire racks, or wall-mounted brackets to create visual interest and maximize space.
When designing your kitchen-inspired garden space, consider weight distribution and stability, particularly for wall-mounted or hanging elements. For smaller balconies, focus on lightweight containers and compact plant varieties, while larger spaces can accommodate groupings of bigger vessels.
Protect metal containers from rust by applying clear sealant to the interior, and place cork or rubber pads under containers to prevent surface damage.
Remember that light-colored containers will keep roots cooler than dark ones, affecting plant selection and placement within your space.
Design a Ladder Plant Stand From Salvaged Wood
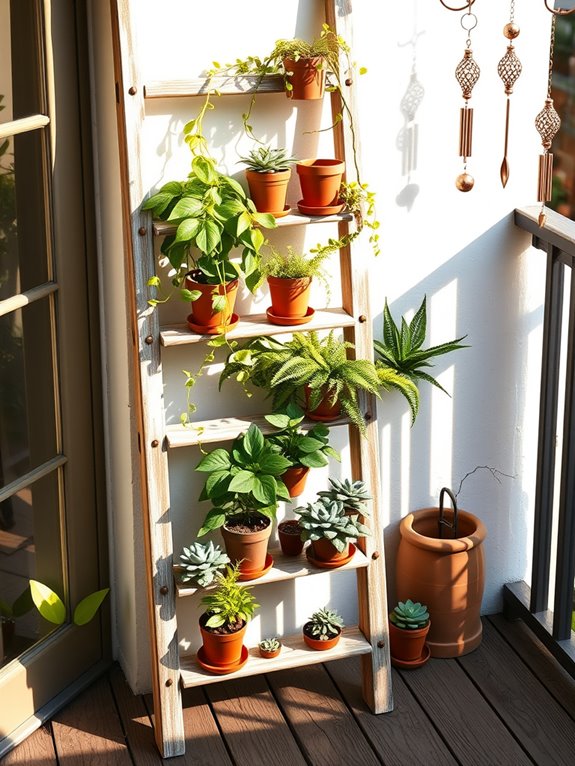
A weathered wooden ladder transformed into a cascading plant display creates an enchanting vertical garden that combines rustic charm with modern upcycling aesthetics. The varying heights of each rung showcase an array of trailing potted plants, from delicate string of pearls cascading downward to compact herbs and succulents nestled securely on wider steps.
The natural patina of salvaged wood adds character and warmth, while the angular lines of the ladder structure provide an architectural element that draws the eye upward. This versatile plant stand becomes a living sculpture, transforming an ordinary corner into a dynamic green space that evolves with the seasons.
Copper-toned pots complement the aged wood, while terra cotta containers add Mediterranean flair. The combination of different plant textures – from soft ferns to structural air plants and flowering specimens – creates a layered effect that brings depth and interest to any garden setting.
Key Elements:
- Salvaged wooden ladder
- Assorted planting containers
- Mixed trailing plants
- Compact upright plants
- Mounting brackets
- Wood sealant
- Decorative pot saucers
- Plant support clips
- Level
- Wall anchors
Position the ladder at a slight angle against a wall, ensuring it’s properly secured with mounting brackets at the top and bottom. Distribute weight evenly by placing larger plants on lower rungs and lighter specimens toward the top.
Treat the wood with weather-resistant sealant to protect against moisture, and install proper drainage solutions beneath each container to prevent water damage to the wood structure. Consider the light requirements of each plant when arranging them on different levels of the ladder.
When designing your ladder plant stand, consider the microclimate of your space – sunny spots near the top may require drought-tolerant plants, while shade-loving specimens might thrive on lower rungs. For smaller balconies, use a shorter ladder or position it in a corner to maximize space.
Incorporate removable pot saucers for easy maintenance, and ensure the ladder’s finish complements your existing outdoor décor. Remember to leave enough space between plants for growth and proper air circulation to prevent disease and maintain healthy specimens.
Turn Glass Bottles Into Garden Border Edging
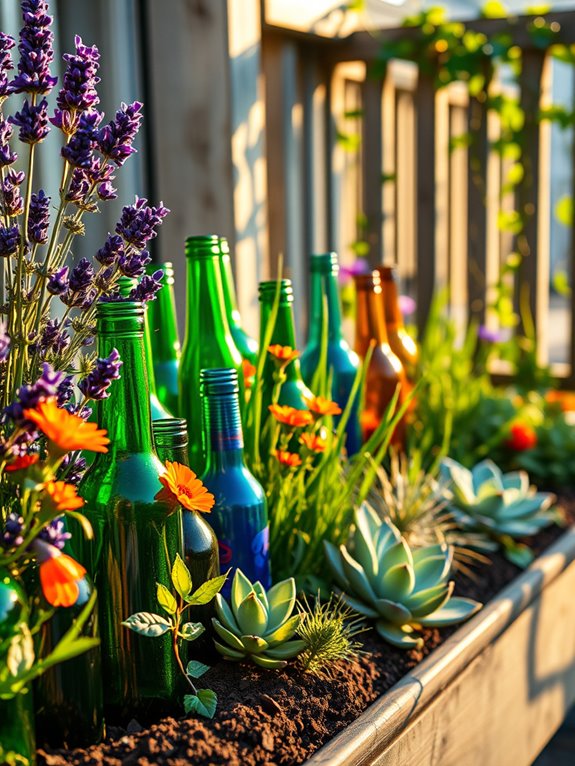
A whimsical border of colorful glass bottles catches the sunlight, creating a magical boundary between garden beds and pathways. Emerald green wine bottles nestle alongside cobalt blue vessels and amber beer bottles, their necks buried deep in the soil while their bases form a striking architectural element. The scattered light creates an ethereal display, particularly during golden hour, when rays dance through the glass and cast colored shadows across creeping thyme and low-growing sedums.
The bottle border provides the perfect framework for cottage-style plantings, where billowing lavender and cascading nasturtiums spill over the gleaming glass edge. This recycled garden feature pairs beautifully with drought-tolerant ornamental grasses and hardy perennials, creating a sustainable and low-maintenance landscape that celebrates both environmental consciousness and artistic expression.
Key Elements:
- Clean, label-free glass bottles of varying colors
- Garden spade or trenching tool
- Landscaping sand
- Gravel for drainage
- Rubber mallet
- Level
- String line or garden hose for marking
- Weather-resistant sealant
- Safety gloves and goggles
Begin implementation by marking your border line using string or a garden hose to ensure a smooth curve or straight edge. Dig a trench approximately 8 inches deep and 6 inches wide, filling the bottom with 2 inches of gravel for drainage. Place bottles upside down in the trench, nestling them together at consistent depths, with roughly 4-6 inches of each bottle exposed above ground. Fill around bottles with sand and soil mixture, tamping gently to secure each bottle without breaking it.
For safety and durability, seal the exposed bottle edges with weather-resistant sealant to prevent chipping. Create visual interest by alternating bottle colors and heights, maintaining a rhythm that complements your garden’s design. Consider your climate when selecting plants to pair with the border – choose specimens that won’t overshadow or overwhelm the bottle display.
When adapting this design for different spaces, smaller areas can utilize miniature bottles or a single-row border, while larger gardens might incorporate double rows or bottle clusters at key focal points. In areas with severe weather, bury bottles deeper and use additional stabilizing materials.
For maximum impact, position borders where they’ll catch morning or evening light, and consider installing solar-powered ground lights to illuminate the bottles after dark, creating a magical nighttime display.
Build a Trellis Using Old Bicycle Wheels
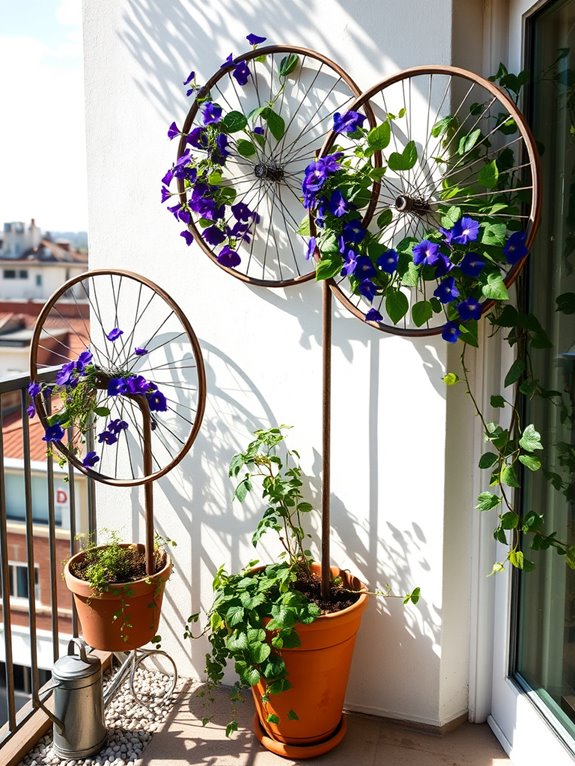
A bicycle wheel trellis creates a whimsical, industrial-chic focal point that transforms ordinary garden spaces into artistic havens. The circular metal frames, stripped of their original purpose, rise gracefully from the earth like sculptures, while climbing vines weave through the spokes creating living mandalas.
Morning glories, clematis, and jasmine spiral upward, their tendrils naturally finding purchase among the wheel’s metallic architecture, creating a mesmerizing blend of mechanical precision and organic growth. The contrast between weathered metal and vibrant greenery offers a striking visual narrative of nature reclaiming human-made elements.
As the seasons progress, the wheels become living calendars, marking time through blooming cycles and changing foliage. During peak flowering periods, the wheels transform into vertical bouquets, with blossoms suspended in mid-air like colorful butterflies caught in a geometric web.
Key Elements:
- Used bicycle wheels (cleaned and rust-treated)
- Metal poles or posts for support
- Climbing plants (annual or perennial)
- Wire or cable ties
- Concrete mix for anchoring
- Decorative ground cover
- Garden soil and compost
- Plant supports and ties
Installation begins with securing metal poles firmly in the ground using concrete, ensuring they’re plumb and equally spaced. Bicycle wheels are then attached to the poles using heavy-duty cable ties or welding, creating a series of vertical climbing surfaces. The wheels should be positioned at varying heights and angles to create visual interest and maximize growing space.
Prepare the soil at the base of each wheel with rich compost and proper drainage to support healthy plant growth. Consider local climate and sun exposure when selecting climbing plants. Morning glories and clematis prefer full sun, while jasmine can tolerate partial shade.
Ensure the trellis structure is stable enough to support mature plant growth, and position wheels to allow adequate spacing between plants. In smaller spaces or balconies, mount wheels directly to walls or railings using brackets, and opt for compact climbing varieties that won’t overwhelm the space. Container gardens can be strategically placed at the base of each wheel to maximize vertical growing potential while minimizing ground space requirements.
Craft Bird Feeders From Teacups and Saucers

Delicate porcelain teacups and saucers transformed into charming bird feeders create an enchanting, vintage-inspired focal point in any garden space. The whimsical arrangement of various patterns and designs, from delicate florals to elegant gold trim, adds a touch of shabby-chic sophistication while serving a practical purpose.
These upcycled feeders attract an array of colorful songbirds, creating a magical atmosphere as they flit between flowering plants and their porcelain dining spots. Surrounding the teacup feeders with cottage garden favorites like lavender, roses, and forget-me-nots enhances the romantic aesthetic.
The gentle tinkling of wind chimes and the soft rustling of ornamental grasses provide a peaceful backdrop to the cheerful bird activity. This creative repurposing of vintage china transforms an ordinary garden into a storybook setting where nature and nostalgia seamlessly blend.
Key Elements:
- Vintage teacups and saucers
- Copper or brass mounting poles
- Strong waterproof adhesive
- Bird seed appropriate for local species
- Complementary flowering plants
- Decorative stones or pebbles
- Small garden tools
- Weather-resistant sealant
- Cleaning supplies
Position the teacup feeders at varying heights using copper poles or hanging mechanisms to create visual interest and accommodate different bird species. Secure cups to saucers using outdoor-rated adhesive, ensuring proper drainage holes are added to prevent water accumulation.
Place feeders near natural protective cover like shrubs or small trees, but far enough away from branches to deter squirrels. Arrange complementary plants in coordinating vintage containers to enhance the theme while providing natural perches and shelter for visiting birds.
When designing this garden feature, consider seasonal adaptations and maintenance requirements. Use weather-resistant sealant on any exposed adhesive joints, clean feeders regularly to prevent mold growth, and position feeders where they can be easily accessed for refilling.
For balcony gardens, mount feeders on railings or use shepherd’s hooks of different heights to maximize vertical space. In smaller areas, focus on creating a concentrated feeding station with 2-3 coordinated teacup feeders rather than spreading them throughout the space.
Remember to place a shallow water source nearby to create a complete bird-friendly environment.
Make Garden Path Stepping Stones From Broken Tiles
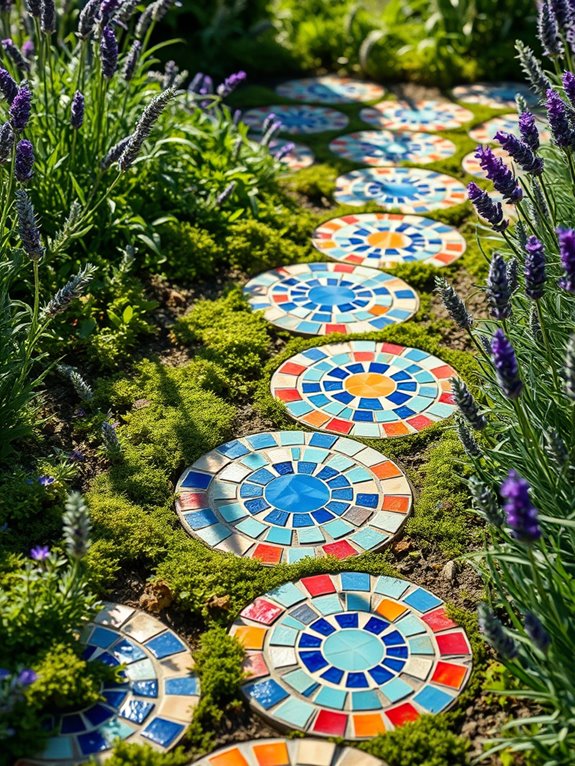
Transform your garden pathway into a vibrant mosaic wonderland with stepping stones crafted from broken tiles, creating an artistic journey through your outdoor space. The irregular patterns and varied colors of repurposed tiles form enchanting pathways that weave between flowering borders and herb gardens, catching sunlight and adding unexpected sparkles of color beneath your feet.
Low-growing plants like creeping thyme and moss peek between the stones, softening their edges and creating a seamless blend between hardscape and nature. These artistic stepping stones become focal points themselves, especially when surrounded by complementary plantings like lavender, Mexican feather grass, and clustered bellflowers.
The combination of glossy tile fragments with natural elements creates a uniquely personal garden path that tells a story through its reclaimed materials, while providing practical, stable footing through garden beds and lawns.
Key Elements Needed:
- Broken ceramic tiles
- Concrete mix
- Stepping stone molds
- Grout
- Garden soil
- Edge plants
- Ground cover plants
- Sand or gravel for base
- Tile nippers
- Safety glasses
- Work gloves
Creating these stepping stones requires careful planning of both placement and design. Begin by laying out your pathway’s shape using string or garden hose to visualize the flow. Prepare each stone’s location by excavating 2-3 inches of soil and filling with compacted sand or gravel.
Arrange broken tiles in pleasing patterns within molds, then pour concrete mix around them, allowing proper curing time before installation. Space stones approximately 24 inches apart on center, accounting for natural stride length.
Design Tips: Consider your color scheme carefully – limit tile colors to 3-4 complementary shades for a cohesive look. For small spaces, create mini-paths using smaller stones placed closer together, or arrange them in a circular pattern to create a focal point.
Weather resistance is crucial, so use outdoor-rated grout and seal finished stones annually. In shady areas, choose slip-resistant tiles and maintain adequate drainage around each stone to prevent moss from becoming too slippery.