
10 Vertical Garden Ideas for Limited Spaces
You don’t need a sprawling backyard to create your own green oasis. Vertical gardens transform tight spaces into lush, living walls by making the most of upward real estate. Whether you’re working with a tiny balcony, narrow patio, or bare indoor wall, these space-smart solutions let you grow herbs, flowers, and vegetables in creative ways. From simple pocket planters to elaborate living wall systems, there’s a vertical gardening approach that’ll match your space, style, and growing ambitions.
Contents
- 1 Pocket Wall Planters: A Simple Starting Point
- 2 DIY Pallet Gardens for Small Balconies
- 3 Hanging Gutter Gardens: Perfect for Herbs
- 4 Space-Saving Tower Gardens
- 5 Trellis Systems for Climbing Plants
- 6 Window-Mounted Herb Gardens
- 7 Modular Grid Wall Planters
- 8 Repurposed Shoe Organizer Gardens
- 9 Stacked Container Gardens
- 10 Living Wall Systems for Indoor Spaces
Pocket Wall Planters: A Simple Starting Point
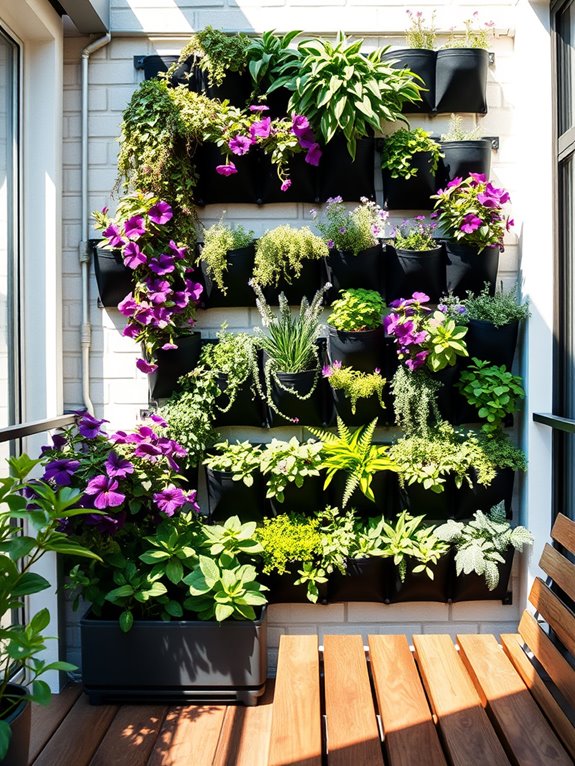
Transform any blank wall into a living tapestry with pocket wall planters, where cascading herbs and flowering plants create an enchanting vertical display. These fabric or plastic pouches, arranged in neat rows or artistic patterns, burst with life as trailing vines spill downward and compact flowering plants reach toward the sky.
The interplay of textures and colors, from the deep greens of mint and oregano to the bright purples of wave petunias and the delicate whites of sweet alyssum, turns an ordinary wall into a dynamic garden feature.
The beauty of pocket planters lies in their ability to create instant impact while maintaining a slim profile, perfect for urban spaces and small balconies. Each pocket becomes its own miniature garden, offering opportunities to experiment with different plant combinations and create stunning visual effects.
The vertical arrangement not only saves precious floor space but also brings plants to eye level, making maintenance and harvesting a pleasure rather than a chore.
Essential Elements:
- Fabric or plastic pocket planters
- Mounting hardware (screws, anchors, brackets)
- Lightweight potting mix
- Drip irrigation system or watering can
- Small-scale plants (herbs, succulents, compact flowers)
- Moisture-resistant backing material
- Drainage collection tray
- Plant food and fertilizer
- Pruning shears
- Garden gloves
Begin installation by securing a moisture-resistant backing to protect your wall, then attach the pocket planter system according to manufacturer specifications. Space pockets to allow adequate growing room for selected plants, considering their mature size.
Fill each pocket with lightweight potting mix, leaving room for root growth. Install plants from the bottom row upward, ensuring each is firmly seated with roots covered. Establish a regular watering schedule, noting that upper pockets may need more frequent watering as gravity pulls moisture downward.
When selecting plants, consider their growth habits and moisture needs. Group plants with similar requirements in adjacent pockets. Fast-growing herbs like mint and oregano work well in lower pockets, while compact flowers and succulents thrive in upper sections.
Monitor soil moisture daily during the first few weeks until plants establish themselves, then adjust watering as needed.
For successful adaptation to different spaces, consider using modular systems that can be expanded or reduced as needed. In very small areas, focus on a single column of pockets filled with herbs for cooking.
Larger walls can accommodate multiple columns with varied plant heights and textures. Install a simple drip irrigation system for easier maintenance in hard-to-reach areas, and position your pocket garden where it receives appropriate light for your chosen plants – most edibles need at least 6 hours of sunlight daily, while shade-loving ornamentals can thrive in less sunny spots.
DIY Pallet Gardens for Small Balconies
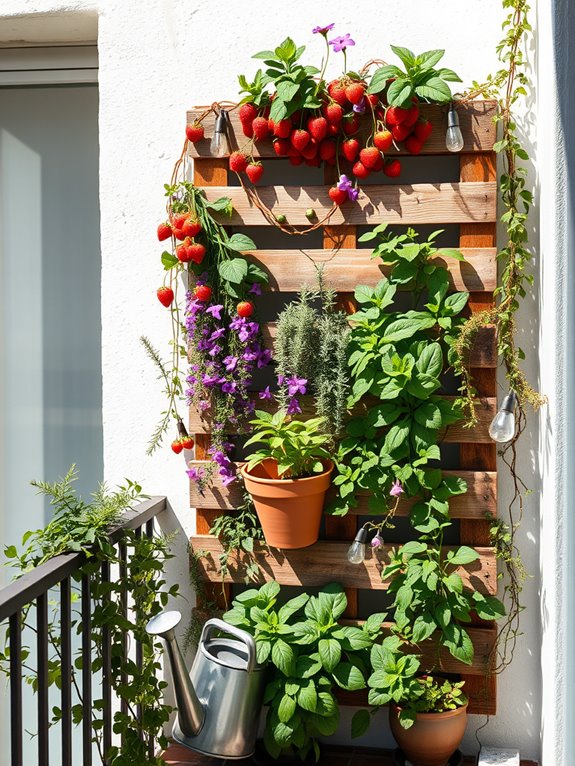
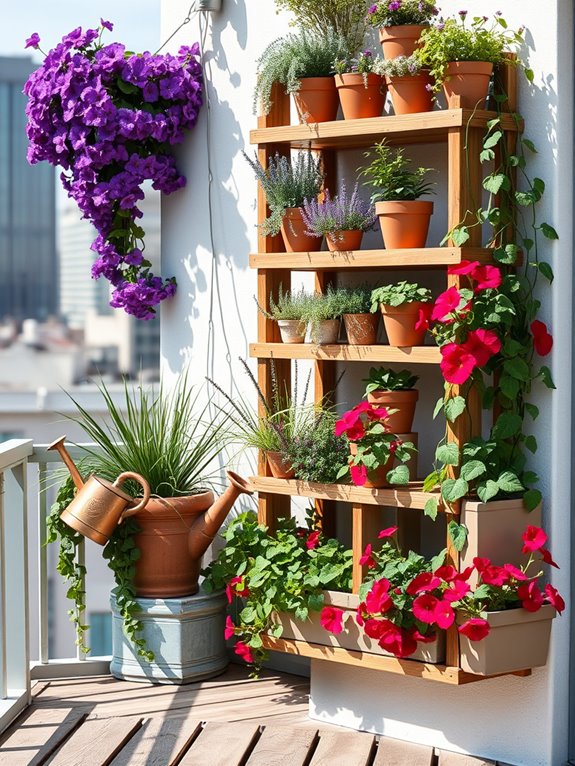
A charming DIY pallet garden transforms an ordinary balcony into a verdant oasis, where repurposed wooden pallets create a striking vertical canvas of cascading herbs, flowers, and compact vegetables. The natural weathered wood adds rustic appeal while providing the perfect backdrop for vibrant trailing plants like strawberries, creeping thyme, and cascading petunias.
String lights woven through the structure create a magical ambiance as evening falls, making the space feel like a secret garden retreat. The multi-tiered design maximizes growing space while maintaining an organized, artistic appearance.
Succulents nestle in upper pockets, their geometric forms contrasting beautifully with soft waves of aromatic herbs like mint and oregano in middle sections. Lower tiers feature practical kitchen herbs and compact vegetables, transforming the balcony into both a functional growing space and an aesthetic masterpiece that draws the eye upward.
Essential Elements:
- Wooden pallets (heat-treated, food-safe)
- Landscape fabric
- Potting soil
- Drainage materials (gravel, pebbles)
- Plant selection (herbs, flowers, vegetables)
- Mounting hardware
- Irrigation system or watering can
- LED string lights
- Weather-protective sealant
- Container plants for base
The implementation begins with thorough pallet preparation: sanding rough edges, applying weather-resistant sealant, and lining with landscape fabric to contain soil.
Mount the pallet securely to the balcony wall, ensuring proper weight distribution and leaving enough space behind for air circulation. Create planting pockets by stapling additional landscape fabric across horizontal slats, filling with well-draining potting mix layered over gravel.
Plant selection and placement require careful consideration of light exposure and water needs. Position drought-tolerant plants in upper sections where soil dries quickly, and moisture-loving varieties in lower pockets.
Install a simple drip irrigation system or plan for regular hand-watering, especially during establishment periods. Maintain the garden through regular pruning, fertilizing during growing seasons, and monitoring for signs of stress or disease.
Success with pallet gardens depends heavily on proper weight management and spatial planning. For smaller balconies, consider using half-pallets or mounting them at an angle to maximize floor space. Alternatively, create modular sections that can be rearranged seasonally.
Weather exposure should guide plant selection and positioning – use wind-resistant species in exposed areas and protect delicate plants in sheltered spots. Regular maintenance checks of mounting hardware and drainage systems ensure long-term stability and plant health.
Hanging Gutter Gardens: Perfect for Herbs
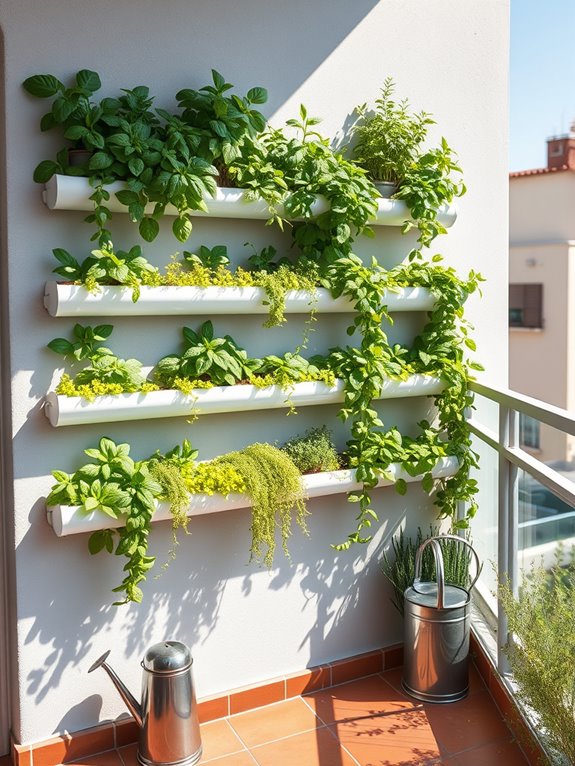
Transform your outdoor space with a sleek, modern hanging gutter garden that turns ordinary rain gutters into a stunning vertical herb display.
Picture pristine white or silver gutters mounted in elegant rows along your wall, bursting with cascading oregano, fragrant basil, and delicate thyme. The linear design creates a contemporary aesthetic while maximizing growing space, allowing herbs to spill over the edges in a controlled yet natural way.
The hanging gutter system brings life to bare walls while providing easy access to fresh culinary herbs. Imagine stepping onto your balcony or patio to be greeted by the mingled aromas of rosemary, mint, and sage, their varying textures and shades of green creating a living tapestry.
The clean lines of the gutters contrast beautifully with the organic growth patterns of the herbs, creating an artistic installation that’s both functional and visually striking.
Essential Elements:
- Vinyl or aluminum rain gutters
- End caps and mounting brackets
- Drainage holes
- Potting soil
- Selection of herbs
- Wall anchors and screws
- Garden tools
- Zip ties or wire (optional)
- Watering can with narrow spout
- Liquid plant fertilizer
Mount the gutters at slight angles to ensure proper drainage, spacing them 12-18 inches apart vertically to allow adequate light penetration and plant growth.
Drill quarter-inch drainage holes every 12 inches along the bottom of each gutter, then secure end caps before mounting. Fill gutters with high-quality potting soil mixed with slow-release fertilizer, leaving an inch of space at the top for watering.
Plant herbs according to their growth habits, placing trailing varieties like thyme and oregano near the edges and upright herbs like basil and parsley toward the center.
Regular maintenance involves checking soil moisture levels daily during warm weather, as gutter gardens can dry out quickly. Harvest herbs frequently to encourage bushier growth and prevent overcrowding.
Consider installing a simple drip irrigation system using small-diameter tubing to ensure consistent watering, especially for larger installations.
For smaller balconies, consider using shorter gutter lengths and focusing on compact herb varieties. Adjust the number of rows based on available wall space, and experiment with combining ornamental trailing plants with culinary herbs for added visual interest.
In windy locations, secure plant stems with small stakes or create windbreaks using clear plastic shields mounted between gutter rows. For year-round growing, position the garden where it can be easily covered during frost or extreme weather conditions.
Space-Saving Tower Gardens
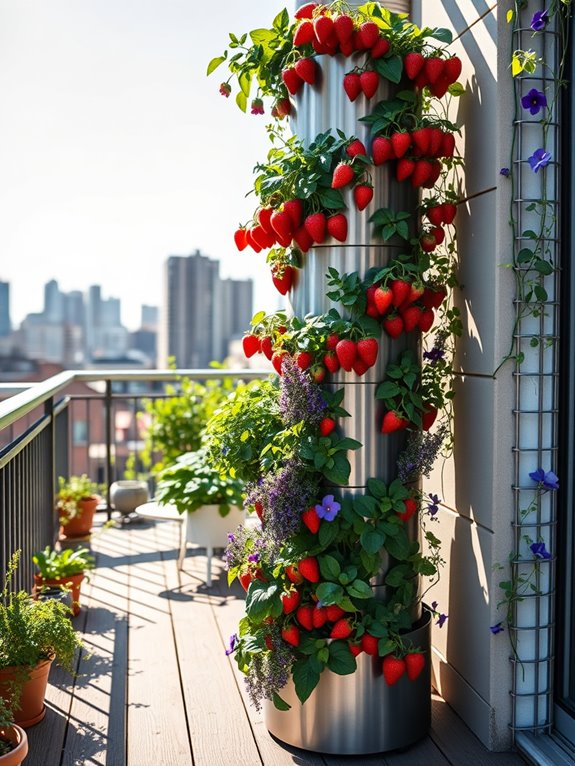
Transform your compact outdoor space into a lush vertical oasis with a striking tower garden that reaches skyward. Sleek cylindrical structures adorned with cascading herbs, vibrant strawberries, and delicate flowering vines create an enchanting spiral of greenery that draws the eye upward. The metallic or natural wooden tiers catch sunlight throughout the day, creating dancing shadows while housing an abundance of edible and ornamental plants in a footprint no larger than a bistro table.
Imagine stepping onto your balcony or patio to find a self-contained ecosystem where butterfly peas climb alongside compact cherry tomatoes, while mint and thyme spill over the edges, releasing their aromatic essence with every gentle breeze. The vertical arrangement allows for a perfect blend of trailing plants like creeping jenny and wave petunias with upright growers such as basil and compact peppers, creating a living sculpture that maximizes growing space while minimizing ground coverage.
Essential Elements:
- Vertical tower structure (metal, wood, or food-grade PVC)
- Drip irrigation system
- Timer-controlled water pump
- Growing medium (lightweight soil mix)
- Plant support rings or ties
- Drainage collection tray
- LED grow lights (optional for shade areas)
- Selection of compact and trailing plants
- Organic fertilizer
- pH testing kit
Setting up a tower garden begins with selecting a location that receives 6-8 hours of sunlight and installing the main structure on a level surface. Connect the irrigation system, ensuring even water distribution throughout all planting pockets or containers.
Layer the growing medium carefully, incorporating slow-release fertilizer, and plant your chosen specimens strategically – placing sun-loving plants at the top and shade-tolerant varieties lower down. Start with larger plants at the base and work upward with progressively smaller specimens to maintain visual balance.
Install support systems for climbing plants early, allowing them to establish proper growth patterns. Regular maintenance includes checking water flow, pruning for shape, and rotating the tower quarterly for even growth.
When designing your tower garden, consider weight distribution and wind exposure, especially for high-rise balconies. For smaller spaces, opt for modular systems that can be expanded vertically rather than horizontally. Incorporate automated watering systems with moisture sensors to prevent over-watering, and choose plants that share similar water and nutrient needs for optimal growth.
Consider installing casters on the base for mobility during extreme weather or for following seasonal sun patterns.
Trellis Systems for Climbing Plants
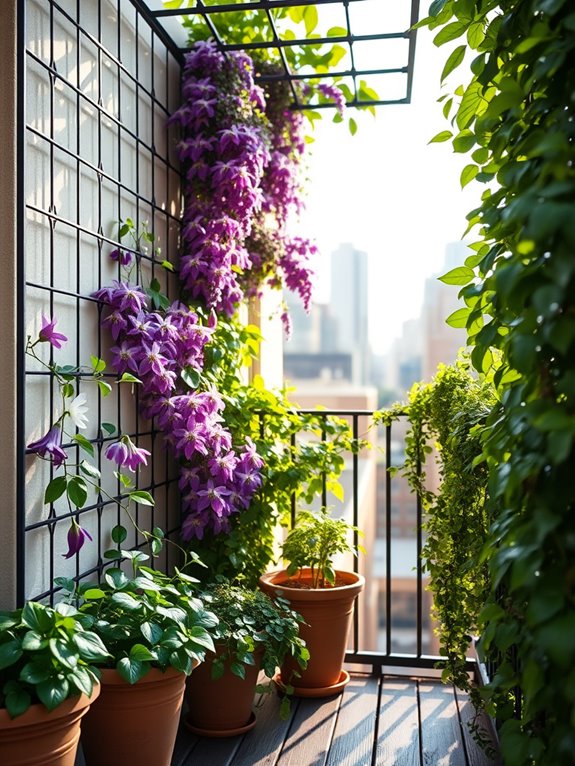
Transform your limited outdoor space into a living tapestry with a trellis system that guides climbing plants toward the sky. Delicate tendrils of jasmine and clematis weave through latticed frameworks, creating an enchanting vertical display of blooms and foliage. The geometric patterns of trellises provide architectural interest even in winter months, while spring and summer bring an explosion of color as flowering vines cascade down the supports.
Morning glories unfurl their purple-blue petals at sunrise, while moonflowers take over the evening display, their white blooms glowing in twilight. The gentle rustling of passion flower vines and the sweet perfume of climbing roses create a secret garden atmosphere, transforming plain walls and posts into living art. This vertical paradise not only maximizes growing space but also provides natural screening and a sense of privacy in urban settings.
Essential Elements:
- Sturdy trellis panels or grid systems
- Support posts and mounting hardware
- Climbing plant varieties (mix of perennial and annual)
- High-quality potting soil
- Large containers with drainage
- Drip irrigation system
- Plant ties or soft twine
- Fertilizer appropriate for flowering vines
Install the trellis system by securely anchoring support posts into heavy containers or mounting directly to walls with appropriate brackets. Ensure the structure can bear the weight of mature plants and withstand wind loads.
Position containers at the base, filling them with well-draining potting mix enriched with slow-release fertilizer. Plant climbers at least 6 inches away from walls to allow proper air circulation and train young vines onto the support structure using plant ties.
Establish a maintenance routine that includes regular pruning to prevent overcrowding and maintain desired shape. Remove dead or crossing stems, and trim back aggressive growers to prevent them from overwhelming slower-growing specimens.
Water deeply but infrequently to encourage deep root growth, and feed plants according to their specific needs during the growing season.
For smaller balconies, consider using modular trellis panels that can be reconfigured as needed, and choose compact climbing varieties like dwarf morning glories or annual sweet peas. Incorporate lightweight materials such as bamboo or vinyl-coated wire mesh for easier installation.
In windy locations, install windbreaks or position trellises against existing structures for added stability. Remember that dark-colored trellises recede visually and make spaces appear larger, while lighter colors stand out as architectural features.
Window-Mounted Herb Gardens
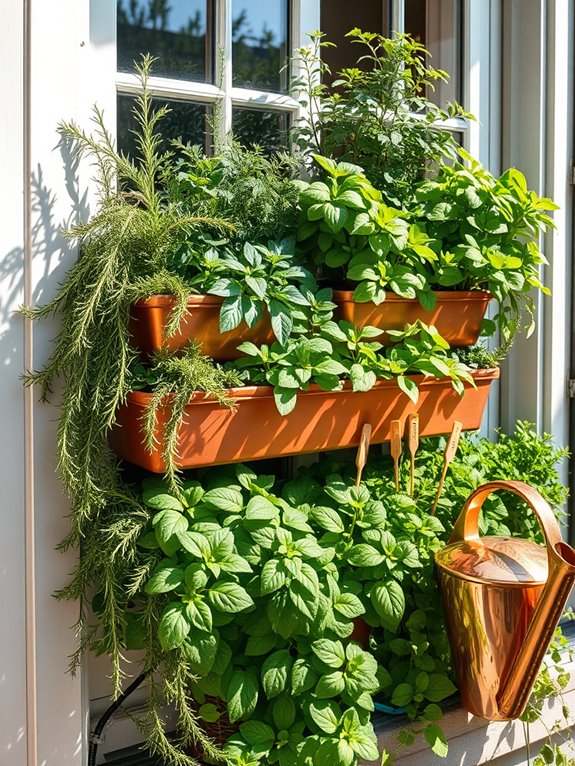
Transform your window into a verdant culinary paradise with a thoughtfully designed herb garden that brings both beauty and function to your living space. Cascading stems of fragrant rosemary and trailing thyme create a living curtain effect, while compact basil and parsley plants add layers of lush greenery at varying heights. The natural light filtering through the leaves casts enchanting shadows across your interior while providing the perfect growing environment for your aromatic collection.
The window-mounted herb garden becomes a stunning focal point that seamlessly blends indoor and outdoor elements. Copper or ceramic planters arranged in geometric patterns catch the morning light, while the varied textures and shades of green create visual interest throughout the day. Small-leaved herbs like oregano and chives provide delicate contrast to broader-leafed sage and mint, creating a tapestry of edible greenery that’s both practical and aesthetically pleasing.
Essential Elements:
- Mounting brackets or window boxes
- Drainage trays
- Herb-specific potting soil
- Selection of culinary herbs
- Water-resistant planters
- Plant markers
- Pruning scissors
- Watering can with narrow spout
Installation begins with securing sturdy mounting brackets to your window frame, ensuring they can support the weight of soil and mature plants. Position planters to maximize sunlight exposure while maintaining easy access for harvesting and maintenance. Layer the containers with proper drainage material before adding herb-specific potting soil, and arrange plants according to their growth habits – placing taller varieties toward the back and trailing herbs near the edges.
Consider light requirements when selecting your herbs, positioning sun-loving varieties like basil and sage where they’ll receive the most direct sunlight. Establish a consistent watering schedule, keeping in mind that window-mounted gardens may dry out more quickly than traditional planters. Install a simple drip system or use self-watering containers to maintain optimal moisture levels.
For optimal success, rotate containers periodically to ensure even growth, and harvest herbs regularly to promote bushiness. Adapt the design to your specific window size by using vertical trellises for larger windows or focusing on compact varieties for smaller spaces. During extreme weather, consider installing clear plastic shields to protect plants from harsh winds or temperature fluctuations, and always ensure your mounting system can handle additional weight from watering and plant growth.
Modular Grid Wall Planters
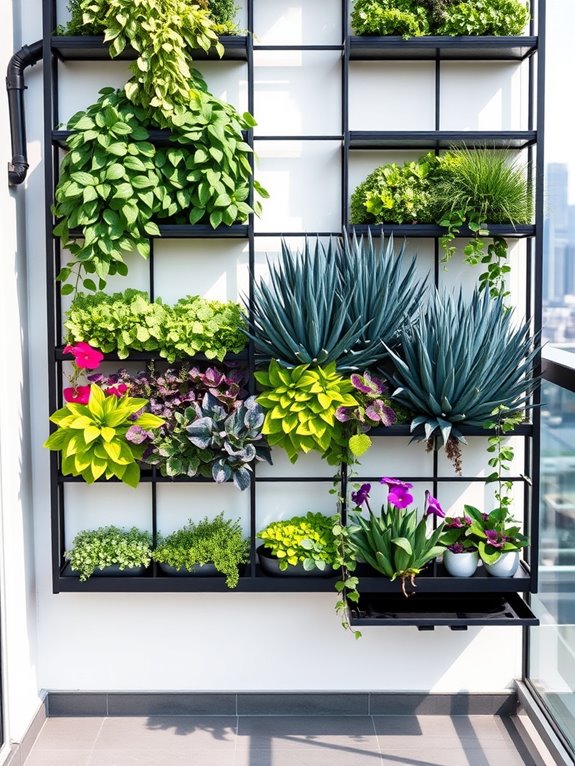
Transform your bare wall into a living tapestry with modular grid wall planters, where geometric precision meets natural beauty. These striking installations create a mesmerizing pattern of greenery, with each compartment hosting different plants that cascade, spike, or bloom. Succulents in silvery blues, trailing pothos in vibrant greens, and flowering specimens like mini petunias create a dynamic interplay of colors and textures against the structured grid framework.
The modern aesthetic of modular grid planters brings an architectural element to your outdoor space while maximizing growing area in a minimal footprint. As light plays across the varied surfaces of leaves and flowers throughout the day, the garden takes on different personalities, from morning dew-kissed freshness to evening shadow patterns that add depth and intrigue to your vertical space.
Key Elements:
- Modular grid planter system
- Wall mounting brackets and hardware
- Irrigation system or watering equipment
- Growing medium suitable for vertical gardens
- Selection of plants with varied growth habits
- Moisture-resistant backing material
- Drainage collection system
- Plant nutrients and fertilizers
- Pruning tools
- Growth monitoring equipment
Begin installation by securing a moisture-resistant backing to your wall, followed by mounting the modular grid system according to manufacturer specifications. Arrange plants based on their light requirements and growth habits, placing sun-loving specimens at the top and shade-tolerant varieties below.
Install an irrigation system that ensures even water distribution, and establish a drainage collection method at the base. Consider the weight capacity of your wall and choose appropriate anchoring systems.
Create visual interest by alternating plant heights, colors, and textures within the grid pattern. Monitor soil moisture levels regularly, as vertical gardens can dry out faster than traditional beds. Trim plants to maintain their designated spaces and prevent overcrowding. Feed plants with appropriate nutrients, keeping in mind that vertical gardens may require more frequent fertilization due to limited soil volume.
Adapt your design based on available space by selecting appropriately sized grid modules. For smaller balconies, focus on compact plant varieties and consider incorporating herbs or small vegetables for practical use. In larger spaces, experiment with multiple grid configurations or create themed sections for different plant families.
Install adjustable lighting if natural light is limited, and consider adding automated irrigation systems for easier maintenance in hard-to-reach areas.
Repurposed Shoe Organizer Gardens
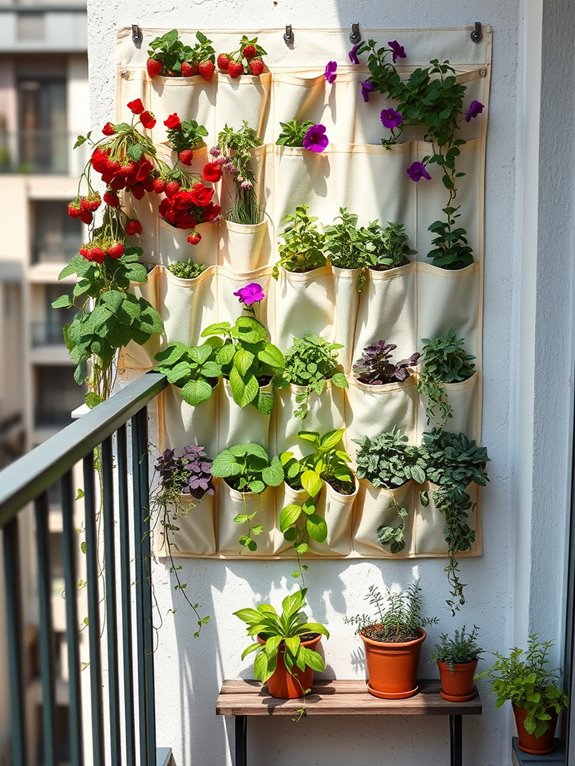
Transform your unused fabric shoe organizer into a lush, cascading garden that brings life to any vertical space. The soft fabric pockets, arranged in neat rows, create an organized yet organic display of trailing herbs, compact flowers, and leafy greens. Strawberry plants peek out from upper pockets, their red fruits dangling like natural ornaments, while purple wave petunias and creeping thyme spill over the edges, creating a living tapestry of color and texture.
The versatility of this garden style allows for seasonal rotation, with bright spring pansies giving way to heat-loving portulaca in summer months. Herbs like mint, oregano, and basil fill the air with aromatic promise, while compact lettuce varieties provide fresh harvests within arm’s reach. The vertical arrangement maximizes growing space while adding a contemporary twist to traditional container gardening.
Essential Elements:
- Over-the-door shoe organizer (fabric)
- Lightweight potting mix
- Small plants or seedlings
- Drainage holes tool
- Wall anchors or strong hooks
- Plastic liner pieces
- Watering can with narrow spout
- Plant markers
- Hand trowel
- Scissors
Begin by reinforcing the shoe organizer’s hanging points and creating drainage holes in each pocket’s bottom corners. Line each pocket with small pieces of plastic to protect the fabric, leaving the drainage holes uncovered. Fill pockets with lightweight potting mix, leaving an inch of space at the top. Place larger plants in upper pockets to ensure stability, with trailing varieties in middle rows and compact plants in lower pockets.
Secure the organizer to your wall or railing using strong anchors, ensuring it can support the weight when fully watered. Check soil moisture daily, as fabric pockets can dry quickly. Water carefully using a narrow-spouted watering can, focusing on individual pockets to prevent overflow. Replace plants as needed and rotate varieties seasonally to maintain visual interest and healthy growth. Prune trailing plants regularly to prevent them from overwhelming neighboring pockets.
For smaller balconies, use half-sized organizers or trim full-sized ones to fit your space. Consider creating multiple narrow columns instead of one wide display, and choose miniature plant varieties for shallower pockets. In wind-prone areas, secure the bottom of the organizer to prevent swaying, and select sturdy plants that can withstand movement. For maximum sunlight efficiency, position sun-loving plants in upper pockets and shade-tolerant varieties in lower rows where they naturally receive less direct light.
Stacked Container Gardens
Transform your limited outdoor space into a lush, multi-tiered oasis with a stacked container garden that draws the eye upward through layers of vibrant greenery and blooms. Terra cotta pots, wooden crates, and metal planters cascade from sturdy shelving units, creating a dynamic vertical display where trailing petunias mingle with cascading ivy, while compact herbs and succulents occupy the upper tiers. The varied heights and textures create an artistic composition that maximizes every square inch of available space.
The architectural elements of stacked containers provide endless opportunities for personalization, from vintage ladders draped with flowering vines to industrial pipe shelving showcasing drought-resistant sedums and echeveria. The combination of different container materials adds visual interest, while strategic placement of plants creates microclimates that support diverse species.
Tall grasses and compact bamboo varieties can serve as natural privacy screens, while flowering annuals provide seasonal color changes.
Essential Elements:
- Sturdy shelving unit or tiered plant stand
- Various sized containers with drainage holes
- Potting soil appropriate for each plant type
- Selection of plants with different growth habits
- Drip irrigation system or watering can
- Plant supports and ties
- Liquid fertilizer
- Pruning shears
- Moisture meter
- Weather-resistant labels
Begin implementation by selecting a location that receives appropriate sunlight for your chosen plants. Ensure your shelving unit is level and secured against walls or railings if necessary.
Place larger containers on lower levels for stability, and arrange plants considering their mature size and growth patterns. Install a drip irrigation system with individual emitters for each container, or develop a consistent hand-watering schedule. Monitor soil moisture levels regularly, as elevated containers may dry out more quickly than ground-level plantings.
Additional Tips: Consider weight limitations of your structure and use lightweight containers where necessary. For smaller balconies, focus on vertical growth using narrow shelving units and selecting compact plant varieties. Incorporate fold-down or movable components to maintain flexibility in your space.
Monitor wind exposure at different heights and secure containers accordingly. During extreme weather, temporary protection may be necessary for delicate plants, so design your system with mobility in mind.
Living Wall Systems for Indoor Spaces
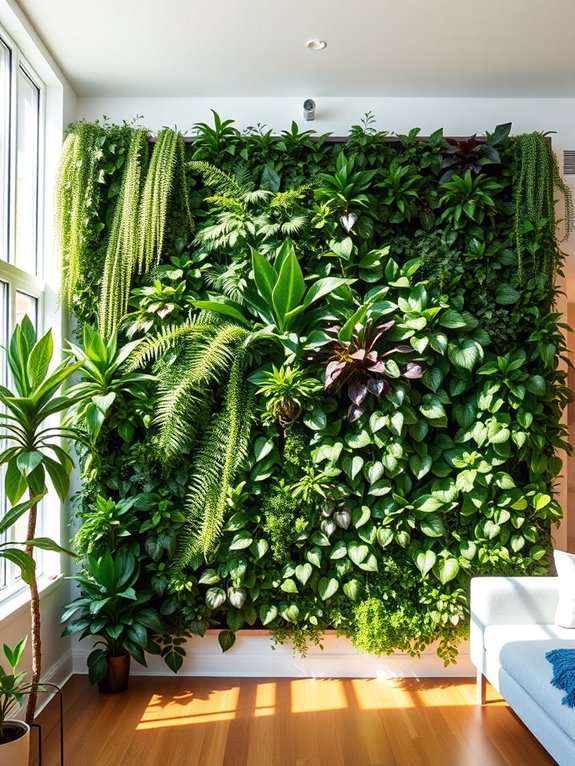
Transform your interior walls into lush, living tapestries with a professionally designed living wall system. Imagine cascading ferns creating gentle green waterfalls, while purple-hued prayer plants and striking snake plants add dramatic architectural elements.
Philodendrons and pothos weave throughout the display, their variegated leaves catching light and creating depth, while compact flowering plants like peace lilies add unexpected bursts of white against the verdant backdrop.
The vertical garden becomes a breathing art installation, purifying the air while serving as a stunning focal point in any room. The layered effect of different leaf textures, sizes, and shades creates a dynamic visual experience that changes throughout the day as natural light plays across the foliage.
Small LED grow lights, strategically placed, cast a warm glow in the evening hours, transforming the living wall into an enchanting nighttime feature.
Essential Elements:
- Modular wall mounting system
- Irrigation system with timer
- Growing medium panels
- Drainage collection tray
- LED grow lights
- Moisture-resistant backing
- Selection of indoor plants
- Plant food and fertilizers
- Maintenance tools
- pH testing kit
Installing a living wall system begins with securing a moisture-resistant backing to protect your wall, followed by mounting the modular panels.
The irrigation system should be installed at the top, allowing water to flow naturally downward through the growing medium. Plants are inserted into pre-cut holes or pockets in the panels, arranged according to their light requirements and growth patterns.
Start with larger, structural plants as anchor points, then fill in with smaller species, ensuring each has adequate room for root development.
Extra Design Tips: Consider your room’s natural light patterns and adjust plant selection accordingly. For smaller spaces, focus on compact plants and incorporate mirrors nearby to amplify the garden’s visual impact.
Always include easy-access points for plant maintenance and ensure your building can support the weight of the fully saturated system. In rooms with limited natural light, supplement with full-spectrum growing lights and choose shade-tolerant species.
Remember to leave space for plants to grow and spread, as overcrowding can lead to maintenance issues later.